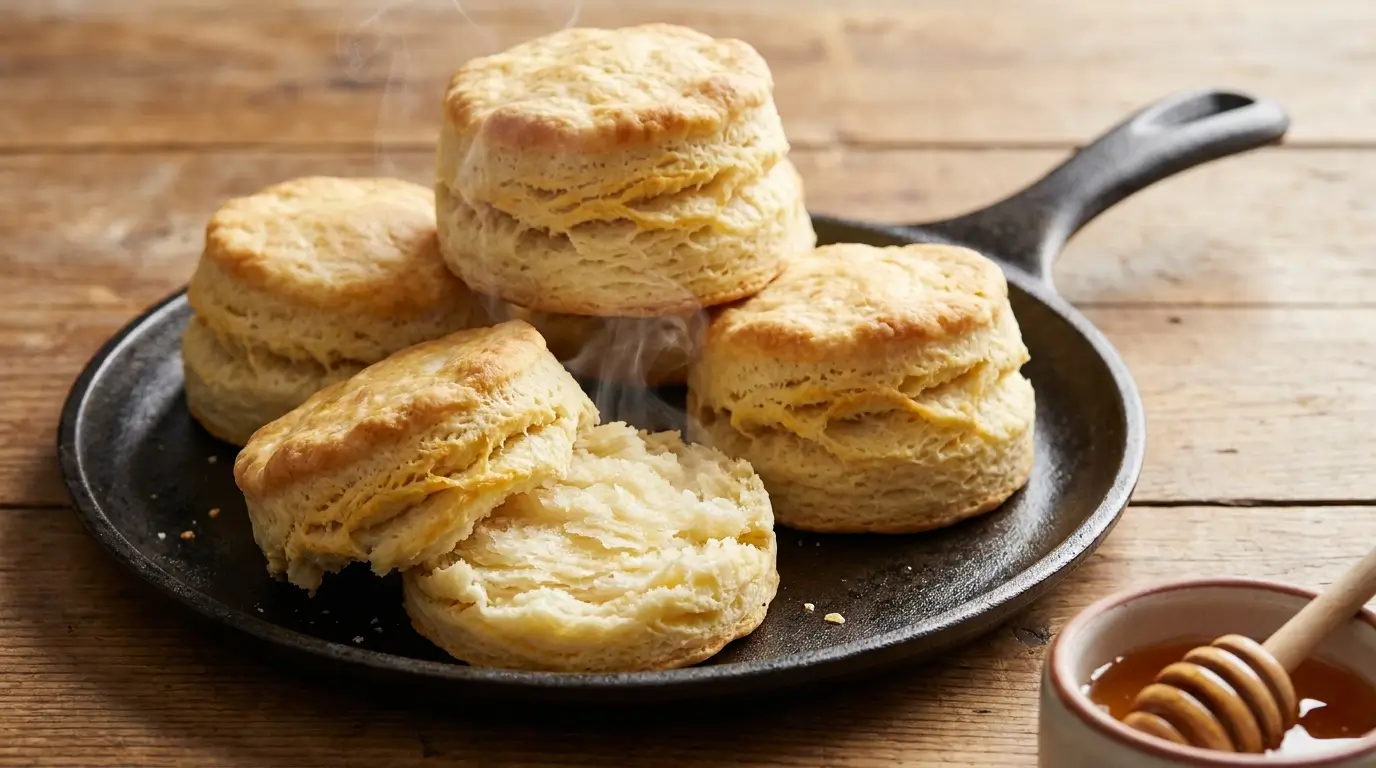
A great buttermilk biscuit has a crust that shatters when you pull it apart, a layered interior that tears into distinct horizontal sheets, and enough lift to look like it was stacked rather than baked. Getting there is not complicated, but it is precise. Every instruction in this recipe exists for a specific structural reason, and understanding those reasons is what separates biscuits that reliably rise from ones that spread flat and taste like hockey pucks.
This recipe uses both baking soda and baking powder — intentionally, and for different reasons. It uses cold butter, not room-temperature. It calls for folding the dough, not kneading it. None of this is arbitrary. The explanations are below, right alongside the instructions, so you can bake with confidence rather than faith.
Table content
Why Buttermilk Biscuits Are a Baking Soda Recipe
Most people think of biscuits as a baking powder recipe. And they are — partly. But buttermilk biscuits specifically rely on the reaction between baking soda and the lactic acid in buttermilk to produce their characteristic tang, deep golden color, and a portion of their lift.
Here is how the two leaveners work together in this recipe:
Baking soda reacts immediately with the acid in the buttermilk the moment the two come into contact. This creates carbon dioxide bubbles right away, which begin expanding the dough. Baking soda also accelerates browning via the Maillard reaction — it raises the dough’s pH, which makes it color faster in the oven. That is why buttermilk biscuits brown more deeply than plain milk biscuits made with baking powder alone.
Baking powder contains its own built-in acid (usually cream of tartar and/or sodium aluminum sulfate) and releases CO₂ in two stages: once when wet and again when heated. It provides the sustained, even lift that carries the biscuit through the full bake time after the baking soda’s initial burst has spent itself.
Together, they produce a biscuit that rises fast, stays risen, and browns properly. Use only baking soda and the biscuit rises sharply then collapses. Use only baking powder and you lose the tang and the deep color. The difference between baking powder and baking soda matters here more than in almost any other recipe.
Ingredients
Yield: 8–10 biscuits | Prep Time: 20 minutes | Bake Time: 14 minutes | Total Time: 34 minutes
| Ingredient | US Measurement | Metric |
|---|---|---|
| All-purpose flour, plus more for dusting | 2 cups | 240 g |
| Baking powder | 1 tbsp | 12 g |
| Baking soda | ¼ tsp | 1.5 g |
| Fine sea salt | 1 tsp | 6 g |
| Granulated sugar | 1 tsp | 4 g |
| Unsalted butter, very cold | 6 tbsp | 85 g |
| Cold full-fat buttermilk, plus more for brushing | ¾ cup + 2 tbsp | 210 ml |
On the butter: It must be cold. Not cool — cold. Many recipes say this; fewer explain why. Cold butter stays in distinct pieces throughout the mixing process. When those pieces hit the hot oven, they release steam before they fully melt, and that steam forces apart the surrounding dough layers. The result is flakiness. Butter that has softened during mixing simply blends into the flour uniformly, producing a tender but flat, crumbly biscuit with no discernible layers. Freeze the butter for 15 minutes before you begin if your kitchen is warm.
On the buttermilk: Full-fat cultured buttermilk gives the best flavor and the most acid for the baking soda to react with. Low-fat works but produces a slightly less tangy result. For a homemade substitute, add 1 tablespoon of white vinegar or lemon juice to a measuring cup, fill to ¾ cup + 2 tbsp (210 ml) with whole milk, stir, and let stand 5 minutes until it curdles slightly. It will not replicate cultured buttermilk’s depth of flavor but will provide the necessary acid.
Instructions
Step 1 — Preheat hard and high
Preheat your oven to 450°F (230°C) and position a rack in the upper third. The high heat is not optional. Biscuits need an aggressive burst of heat the moment they go in — this creates rapid steam from the butter and buttermilk, which drives the layers apart before the gluten network sets. A moderate oven produces a biscuit that browns slowly and never fully rises.
Line a baking sheet with parchment paper or use a cast-iron skillet. Both work well; the skillet produces slightly crispier sides from the retained heat.
Step 2 — Whisk the dry ingredients
In a large bowl, whisk together the flour, baking powder, baking soda, salt, and sugar until evenly distributed. The sugar is a small amount — just enough to promote browning without making the biscuit sweet. Do not omit it, but do not increase it either.
Step 3 — Cut in the cold butter
Grate the cold butter directly into the flour using the large holes of a box grater — this is the fastest and most reliable method for home bakers. Alternatively, cut it into ¼-inch cubes and work it in with your fingertips or a pastry cutter.
Either way, work quickly. The goal is a mixture that looks like rough, uneven breadcrumbs with visible flat pieces of butter the size of small peas throughout. If the butter starts to feel greasy rather than crumbly, the mixture is too warm. Refrigerate the bowl for 10 minutes before proceeding.

Step 4 — Add the buttermilk
Make a well in the center of the flour-butter mixture. Pour in the cold buttermilk all at once. Using a fork or rubber spatula, stir from the center outward with 12–15 deliberate strokes until a shaggy dough forms. Stop as soon as no large dry patches remain. The dough will look rough and slightly sticky — that is exactly right.
Do not stir until smooth. Do not mix thoroughly. Overworking at this stage develops gluten strands that make the finished biscuit tough rather than tender.
Step 5 — Fold for layers (the one technique that makes the difference)
Turn the dough out onto a lightly floured surface. Pat it gently into a rough rectangle about ¾ inch (2 cm) thick. Then do the following:
- Fold the right third over the middle third.
- Fold the left third over the top (like a letter).
- Pat back out to ¾ inch thickness.
- Repeat the fold twice more — three folds total.
This lamination technique creates the distinct horizontal layers that pull apart in sheets when the biscuit is done. Each fold multiplies the number of butter-dough layers. You are doing, in miniature, what a croissant takes an entire day to achieve.
After three folds, pat the dough out to a final thickness of ¾ to 1 inch (2–2.5 cm). Thinner than ¾ inch and the biscuits will not have enough height to develop layers. Thicker than 1 inch and the outside will overbrown before the center is fully baked.

Step 6 — Cut the biscuits
Use a sharp round cutter — 2½ inches (6.5 cm) is standard — and press straight down without twisting. Twisting seals the cut edges and prevents the layers from separating during baking. The cutter should go through the dough in one clean press.
Cut biscuits as close together as possible to minimize the scraps you need to re-roll. Re-rolled dough has more gluten development than the first cut and will produce slightly tougher biscuits — they are still good, just less tender than the first batch.
Place the biscuits on the prepared baking sheet with their sides just barely touching. This is intentional: biscuits baked close together support each other as they rise and are forced to climb upward rather than spreading outward.

Step 7 — Brush and bake
Brush the tops (not the sides) lightly with buttermilk, melted butter, or heavy cream. Brushing the sides will glue the layers together and inhibit rise. Bake for 12–15 minutes, until the tops are deep golden brown and the sides show visible layers.
Do not open the oven in the first 10 minutes.
Step 8 — Serve immediately
Biscuits are best eaten within 20 minutes of coming out of the oven, while the crust is still crisp and the interior is steamy. They are made to be eaten fresh. This is not a loaf that improves overnight.

The Three Reasons Biscuits Don’t Rise
1. The butter was too warm. If you cannot see distinct butter pieces in the dough before it goes into the oven, those pieces have already melted into the flour. There is no steam event, no layer separation, no lift. Keep everything cold and work fast.
2. The dough was overworked. Every extra stir or fold develops gluten. Gluten traps CO₂ during baking, which sounds good — but an overdeveloped gluten network in a biscuit dough is too elastic. It springs back against the leavening pressure instead of allowing the layers to open. Mix until just combined, fold exactly three times, and stop.
3. The baking soda was dead or the baking powder was old. Baking soda loses potency quickly once opened, especially in humid conditions. Baking powder typically has a 6–12 month active life. If either has been open in your cupboard for more than a year, replace them before baking. To test your baking soda, drop a small amount into hot acidified water — it should bubble immediately and vigorously. The complete guide to baking soda covers testing, storage, and shelf life in detail.
Variations Worth Knowing
Cheddar herb biscuits: Add ¾ cup (75 g) of finely grated sharp cheddar and 1 tablespoon of chopped fresh chives to the dry ingredients before cutting in the butter. Proceed as usual. The cheese adds moisture and fat, so the biscuits may need an extra 2 minutes in the oven.
Honey butter biscuits: Mix 2 tablespoons of honey into the buttermilk before adding it to the dry ingredients. Brush the tops with honey butter (equal parts melted butter and honey) immediately after baking.
Drop biscuits: Increase the buttermilk to 1 cup (240 ml). The dough will be too wet to roll. Drop ¼-cup (60 ml) portions directly onto the baking sheet, spacing them 2 inches apart. No folding, no cutting. Drop biscuits are rougher in shape and texture but take 5 minutes less work and are forgiving for beginners.
Whole wheat biscuits: Substitute up to half the all-purpose flour with whole wheat flour (swap 1:1 by weight). Increase the buttermilk by 1–2 tablespoons to compensate for the added absorption. The biscuits will be denser and more savory — excellent with sharp cheese or alongside soup.
Storage
Same day: Best within 2 hours of baking. After that, the crust softens as the interior moisture migrates outward.
Day 2: Wrap cooled biscuits in a clean cloth or paper bag at room temperature. Reheat at 350°F (175°C) for 5–8 minutes, uncovered, to restore the crust. Do not microwave — it steams the crust soft and makes the interior gummy.
Freezer: Freeze baked biscuits in a single layer, then transfer to a zip bag for up to 2 months. Reheat directly from frozen at 375°F (190°C) for 12–15 minutes. Alternatively, freeze unbaked cut biscuits on a sheet, then transfer to a bag. Bake directly from frozen, adding 3–5 minutes to the bake time.
Common Questions
Why did my biscuits spread sideways instead of rising up?
Almost always warm butter or dough that rested too long before going into the oven. The CO₂ produced by the baking soda reacts the moment buttermilk meets the dough — delay getting the biscuits into the oven and that initial leavening event is wasted before baking begins. Mix, cut, and bake with as little delay as possible.
Can I use salted butter?
Yes, but reduce the salt in the recipe by ¼ teaspoon to compensate.
Can I make the dough ahead?
The folded, cut biscuits can be refrigerated overnight on the baking sheet, covered loosely with plastic wrap. Bake cold, straight from the refrigerator. This actually improves flakiness because the butter stays colder. Add 2 minutes to the bake time.
Do I have to use a round cutter?
No. A sharp knife or bench scraper works just as well for cutting square biscuits — and square cuts waste no dough, meaning your entire batch comes from the first and most tender roll. Many professional bakers cut square for exactly this reason.
What if I only have baking powder and no baking soda?
Use 1 tablespoon + 1 teaspoon of baking powder and substitute regular whole milk for the buttermilk. The biscuits will rise adequately and be tender, but they will lack the tang and deep browning that the buttermilk-and-baking-soda combination produces. They are a different biscuit — not worse, just different.
Classic Buttermilk Biscuits

Flaky, golden classic buttermilk biscuits with a crisp crust and tender layered interior, built on precise technique for reliable rise and flavor.
- Prep Time: 20 minutes
- Cook Time: 14 minutes
- Total Time: 34 minutes
- Yield: 8–10 biscuits 1x
- Category: Baking
- Method: Baked
- Cuisine: American
- Diet: Vegetarian
Ingredients
- 2 cups all-purpose flour (plus more for dusting)
- 1 tbsp baking powder
- 1/4 tsp baking soda
- 1 tsp fine sea salt
- 1 tsp granulated sugar
- 6 tbsp unsalted butter, very cold
- 3/4 cup + 2 tbsp cold full-fat buttermilk (plus more for brushing)
Instructions
- Preheat oven to 450°F (230°C) and line a baking sheet or prepare a cast-iron skillet.
- Whisk flour, baking powder, baking soda, salt, and sugar in a large bowl.
- Grate or cut cold butter into the flour mixture until it resembles coarse crumbs with visible butter pieces.
- Make a well, pour in buttermilk, and mix gently with 12–15 strokes until a shaggy dough forms.
- Turn dough onto a floured surface and pat into a 3/4-inch thick rectangle.
- Fold dough into thirds like a letter, repeat folding 3 times total.
- Pat dough to 3/4–1 inch thickness.
- Cut biscuits with a round cutter without twisting.
- Place biscuits close together on baking sheet.
- Brush tops lightly with buttermilk or butter.
- Bake for 12–15 minutes until golden brown.
- Serve warm immediately.
Notes
Keep butter and dough cold at all times. Do not overmix. Bake immediately after cutting for best rise and flakiness.
Nutrition
- Serving Size: 1 biscuit
- Calories: 210
- Sugar: 1g
- Sodium: 300mg
- Fat: 11g
- Saturated Fat: 7g
- Unsaturated Fat: 3g
- Trans Fat: 0g
- Carbohydrates: 24g
- Fiber: 1g
- Protein: 4g
- Cholesterol: 30mg
Keywords: buttermilk biscuits, flaky biscuits, classic biscuits, baking, quick bread
How This Fits Into the Quick-Bread Family

Buttermilk biscuits sit in the same chemical family as Irish soda bread and banana bread — all three are quick breads that use baking soda (or a combination of soda and powder) rather than yeast to rise. The key distinction is technique: soda bread is shaped and baked as a whole round with minimal handling; banana bread is poured into a loaf pan as a wet batter; and biscuits demand the lamination step that creates their layers. Same chemistry, three completely different results. Every recipe in the baking cluster follows this pattern — baking soda as the engine, technique as the variable that shapes the final outcome.