Irish soda bread is one of the most honest loaves you will ever bake. No yeast, no long proof, no stand mixer required — just flour, buttermilk, salt, and the chemical reaction that happens when baking soda meets an acid. You mix, shape, score, and bake. Start to finish in under an hour.
This recipe produces a dense, slightly tangy loaf with a crackling crust and a tender, slightly coarse crumb. It is nothing like sandwich bread — it is not supposed to be. It is meant to be torn warm, spread with salted butter, and eaten the same day it is baked.
Below you will find the full recipe with US and metric measurements, a clear explanation of the chemistry behind why baking soda (not yeast) makes this bread rise, practical tips to avoid the two most common mistakes, and answers to every question that comes up when people bake this for the first time.
Table content
- 1 What Makes Irish Soda Bread Different From Every Other Bread
- 2 Ingredients
- 3 Instructions
- 4 Two Mistakes That Ruin the Loaf
- 5 Variations
- 6 No Buttermilk? Here Is the Fix
- 7 How to Store Irish Soda Bread
- 8 Why Soda Bread Goes Stale Faster Than Yeast Bread
- 9 Common Questions
- 10 Classic Irish Soda Bread
- 11 The Loaf That Teaches You Baking Soda
What Makes Irish Soda Bread Different From Every Other Bread
Most bread relies on yeast — a living organism that consumes sugar and releases carbon dioxide over hours of fermentation. Irish soda bread skips all of that. The leavening agent is a simple chemical reaction: baking soda (sodium bicarbonate) + an acid (buttermilk) = carbon dioxide bubbles + water + sodium salt.
Those bubbles form the moment the two ingredients meet, which is why you must work quickly and get the dough into the oven fast. Unlike yeast breads, there is no second rise, no punching down, no resting. Speed is a feature, not a flaw.
The acid in traditional Irish soda bread comes from buttermilk — specifically from the lactic acid produced by bacterial cultures during fermentation. If you want to understand how this reaction differs from baking powder (which contains its own built-in acid), the baking powder vs. baking soda breakdown covers the chemistry in plain English.
This is why Irish soda bread is historically associated with Ireland specifically: the country had an abundance of sour milk and buttermilk, and baking soda arrived as an affordable imported leavener in the mid-19th century. The combination was practical, fast, and cheap — and the result happened to be delicious.
Ingredients

Yield: 1 loaf (8–10 slices) | Prep Time: 10 minutes | Bake Time: 45 minutes | Total Time: 55 minutes
| Ingredient | US Measurement | Metric |
|---|---|---|
| All-purpose flour | 4 cups | 480 g |
| Baking soda | 1 tsp | 5 g |
| Fine sea salt | 1½ tsp | 9 g |
| Cold buttermilk | 1¾ cups | 415 ml |
That’s it. Four ingredients. Everything else is optional, and the optional additions are listed under Variations below.
On the flour: All-purpose works well and is the most forgiving. Traditional Irish recipes use soft wheat flour (lower protein, ~9–10%), which produces a more tender crumb. If you have access to whole wheat pastry flour or Irish-style flour, substitute up to half the all-purpose for a slightly earthier loaf.
On the baking soda: Use 1 teaspoon, measured level — not heaping. Too much baking soda leaves a metallic, soapy aftertaste and can cause excessive browning. This is the most common measurement mistake in home recipes.
On the buttermilk: Full-fat buttermilk gives the best flavor and texture. Low-fat works but produces a slightly drier crumb. See the substitution note below if you do not have buttermilk on hand.
Instructions
Step 1 — Preheat the oven
Preheat your oven to 425°F (220°C). Line a baking sheet with parchment paper or lightly flour it. You can also bake in a cast-iron skillet or a Dutch oven for a more even crust.
Step 2 — Whisk the dry ingredients
In a large bowl, whisk together the flour, baking soda, and salt until evenly combined. Do this thoroughly — uneven distribution of baking soda leads to bitter pockets in the finished loaf.
Step 3 — Add the buttermilk

Make a well in the center of the dry ingredients. Pour in the buttermilk all at once. Using a fork or your hand, stir from the center outward until a shaggy, sticky dough forms. Do not overmix. The moment the flour is incorporated, stop. Overworking develops gluten, which produces a dense, tough loaf instead of the tender, open crumb you want.
The dough should feel tacky — wetter than pizza dough, slightly firmer than biscuit dough. If it seems too dry, add buttermilk one tablespoon at a time. Humidity, flour brand, and how you measure all affect absorption.
Step 4 — Shape the loaf
Turn the dough out onto a lightly floured surface. With well-floured hands, gently shape it into a round about 2 inches (5 cm) thick. Do not knead. Pat and coax, not press and fold.
Place the round on the prepared baking sheet.
Step 5 — Score the top

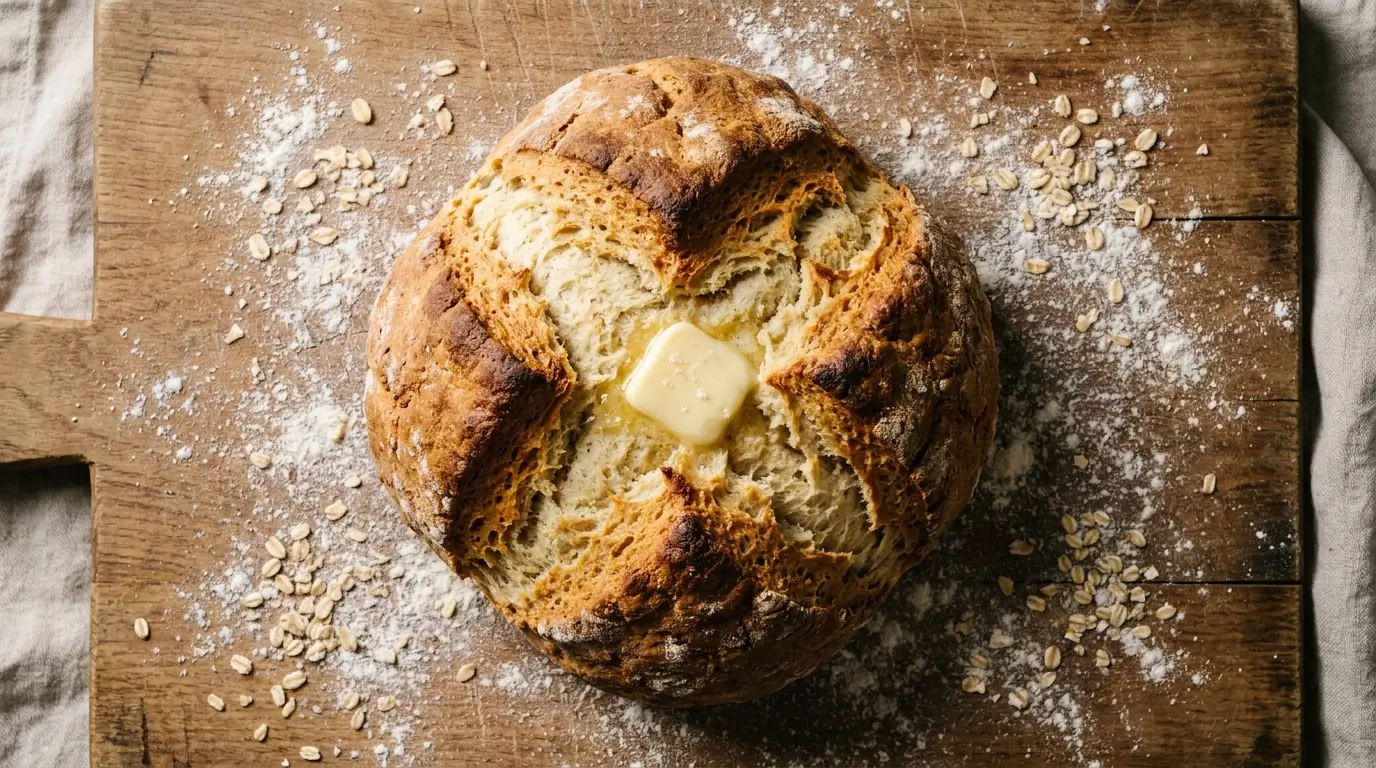
Using a sharp knife or bench scraper, cut a deep cross into the top — about ¾ of the way through the loaf. This is not decorative. The score allows the center to rise without cracking the crust unevenly, and it helps the inside bake through before the crust sets.
Irish tradition holds that the cross “lets the fairies out” — but structurally, it controls oven spring and prevents a gummy center.
Step 6 — Bake
Bake at 425°F (220°C) for 40–45 minutes, until the crust is deep golden brown and the bottom sounds hollow when tapped. If you have an instant-read thermometer, the center should read 195–200°F (90–93°C).
Do not open the oven in the first 30 minutes. The early steam created by the buttermilk and the rapid CO₂ release is doing critical work.
Step 7 — Cool before slicing
Transfer to a wire rack and cool for at least 20 minutes before cutting. The crumb continues to set during this time. Cutting too early produces a gummy, doughy texture even if the loaf is fully baked.
Two Mistakes That Ruin the Loaf

Mistake 1: Overmixing
The entire point of a soda bread is a light, quick mix. As soon as the dough comes together, your job is done. More mixing = more gluten development = a tight, chewy, dense result. Think of it like buttermilk biscuits — the technique is almost identical, the goal is the same.
Mistake 2: Waiting too long to bake
The CO₂ reaction starts the moment buttermilk and baking soda contact each other. Shaped dough sitting on the counter for 20 minutes before going into the oven will have already spent a significant portion of its leavening power. Mix, shape, and bake with as little delay as possible.
Variations
These additions are all compatible with the base recipe. Introduce one or two at most — piling in too many extras muddies the flavor of what is supposed to be a simple bread.
Brown soda bread: Replace 2 cups (240 g) of the all-purpose flour with whole wheat flour. The loaf will be denser and more savory. Reduce baking time by about 5 minutes, as whole wheat absorbs more moisture and conducts heat differently.
Seeded loaf: Add 2 tablespoons of caraway seeds or mixed seeds (pumpkin, sunflower, sesame) to the dry ingredients before mixing.
Sweetened tea cake version (spotted dog): Add 2 tablespoons of sugar and 1 cup (150 g) of raisins or currants to the dry ingredients. This version — sometimes called “spotted dog” or “railway cake” — is technically a variation of soda bread rather than the traditional savory loaf.
Herb and cheese: Fold in ½ cup (50 g) of grated sharp cheddar and 1 tablespoon of fresh rosemary with the buttermilk. Serve alongside soup.
No Buttermilk? Here Is the Fix
If you do not have buttermilk, you can make a quick substitute that provides the necessary acid:
- Add 1 tablespoon of white vinegar or lemon juice to a measuring cup, then fill to 1¾ cups (415 ml) with whole milk. Stir and let sit for 5 minutes until slightly curdled. This is not identical to cultured buttermilk — it lacks the depth of flavor — but it produces the correct chemical reaction.
Do not use water, plant milks, or low-acid substitutes. The acid is not optional; it is half the leavening system.
How to Store Irish Soda Bread
Day 1: Best eaten fresh, still slightly warm, in the first 6–8 hours. The crust is crisp, the crumb is moist, and the flavor is at its peak.
Day 2: Wrap tightly in a clean cloth or beeswax wrap (not plastic, which makes the crust soggy). Toast slices to revive texture.
Days 3–5: Texture degrades noticeably. At this point, use slices for toast, croutons, or bread pudding.
Freezer: Irish soda bread freezes well. Slice the cooled loaf, wrap individual slices in parchment, and freeze in a zip bag for up to 3 months. Toast directly from frozen.
Do not refrigerate. Cold temperatures accelerate the staling of starches and make the crumb gummy faster than room temperature storage.
Why Soda Bread Goes Stale Faster Than Yeast Bread
This is a fair question. Yeast-leavened bread stays fresh longer because the fermentation process produces compounds (organic acids, alcohols) that slow starch retrogradation — the scientific term for the process that makes bread stale. Soda bread skips fermentation entirely, so it has none of those protective compounds. The upside is simplicity and speed. The tradeoff is a shorter shelf life.
If you regularly bake Irish soda bread and want to understand more about the role baking soda plays as a leavening agent compared to yeast — including when it is and is not appropriate — the complete guide to baking soda covers this in depth.
Common Questions
Can I use baking powder instead of baking soda?
You can, but the result will be different. Baking powder contains its own acid (usually cream of tartar or sodium aluminum sulfate), so it does not need the buttermilk to activate. The loaf will rise slightly differently and the flavor will be flatter and less tangy. If you use baking powder, use 2½ teaspoons in place of the 1 teaspoon of baking soda, and you can substitute regular milk for the buttermilk. The bread will be technically correct but not traditional.
Why does my bread taste metallic or soapy?
Almost always too much baking soda, or baking soda that was not fully incorporated into the dry ingredients before mixing. Measure level, whisk thoroughly, and keep it to 1 teaspoon.
My loaf looks done outside but is gummy inside — why?
Three possible causes: (1) the loaf was too thick before baking — aim for 2 inches maximum; (2) the oven temperature was too low, causing the outside to color before the inside cooked through; (3) you sliced it too early before the crumb had time to set. Use a thermometer for certainty — 195°F (90°C) at the center means it is done.
Can I make this gluten-free?
Gluten-free flour blends produce variable results with soda bread. A 1:1 gluten-free flour blend (one that includes xanthan gum) tends to work better than single-grain alternatives. Expect a denser, more crumbly loaf. The leavening chemistry is identical; the structure is less forgiving without gluten.
Is Irish soda bread healthy?
It is a bread — calorie-dense by nature. Compared to enriched sandwich bread with added sugar, fats, and preservatives, the four-ingredient version here is straightforward and ingredient-clean. The whole wheat variation adds fiber. It is not a health food, but it is a real food with no hidden ingredients.
Classic Irish Soda Bread
A traditional Irish soda bread made with just four ingredients, producing a dense, slightly tangy loaf with a crisp crust and tender crumb. No yeast, no proofing — just mix, shape, and bake.
- Prep Time: 10 minutes
- Cook Time: 45 minutes
- Total Time: 55 minutes
- Yield: 1 loaf (8–10 slices) 1x
- Category: Bread
- Method: Baking
- Cuisine: Irish
- Diet: Vegetarian
Ingredients
- 4 cups (480 g) all-purpose flour
- 1 teaspoon baking soda
- 1½ teaspoons fine sea salt
- 1¾ cups (415 ml) cold buttermilk
Instructions
- Preheat oven to 425°F (220°C) and prepare a baking sheet.
- Whisk flour, baking soda, and salt together thoroughly.
- Make a well in the center and pour in the buttermilk.
- Mix gently until a shaggy dough forms. Do not overmix.
- Turn onto a floured surface and shape into a round about 2 inches thick.
- Place on baking sheet and score a deep cross on top.
- Bake for 40–45 minutes until golden brown and hollow-sounding when tapped.
- Cool on a rack for at least 20 minutes before slicing.
Notes
Work quickly once the buttermilk is added to preserve leavening. Do not overmix, and avoid using too much baking soda to prevent a bitter taste.
Nutrition
- Serving Size: 1 slice
- Calories: 180
- Sugar: 2g
- Sodium: 320mg
- Fat: 2g
- Saturated Fat: 1g
- Unsaturated Fat: 1g
- Trans Fat: 0g
- Carbohydrates: 34g
- Fiber: 1g
- Protein: 5g
- Cholesterol: 5mg
Keywords: irish soda bread, quick bread, no yeast bread, traditional bread, buttermilk bread
The Loaf That Teaches You Baking Soda

Bake this bread once and you understand, in a direct, sensory way, what baking soda actually does. The dough hisses faintly when the buttermilk hits the dry ingredients. The loaf springs up visibly in the first 15 minutes. The crust browns faster than a yeast bread because there are no sugars consumed during fermentation — they are all still present, available to brown under heat.
If you enjoy baking with baking soda and want to continue, banana bread uses the same leavening principle with a different acid source (ripe bananas), and is a natural next bake once you have made this one. Both are part of the baking cluster here — every recipe tested, every step explained.