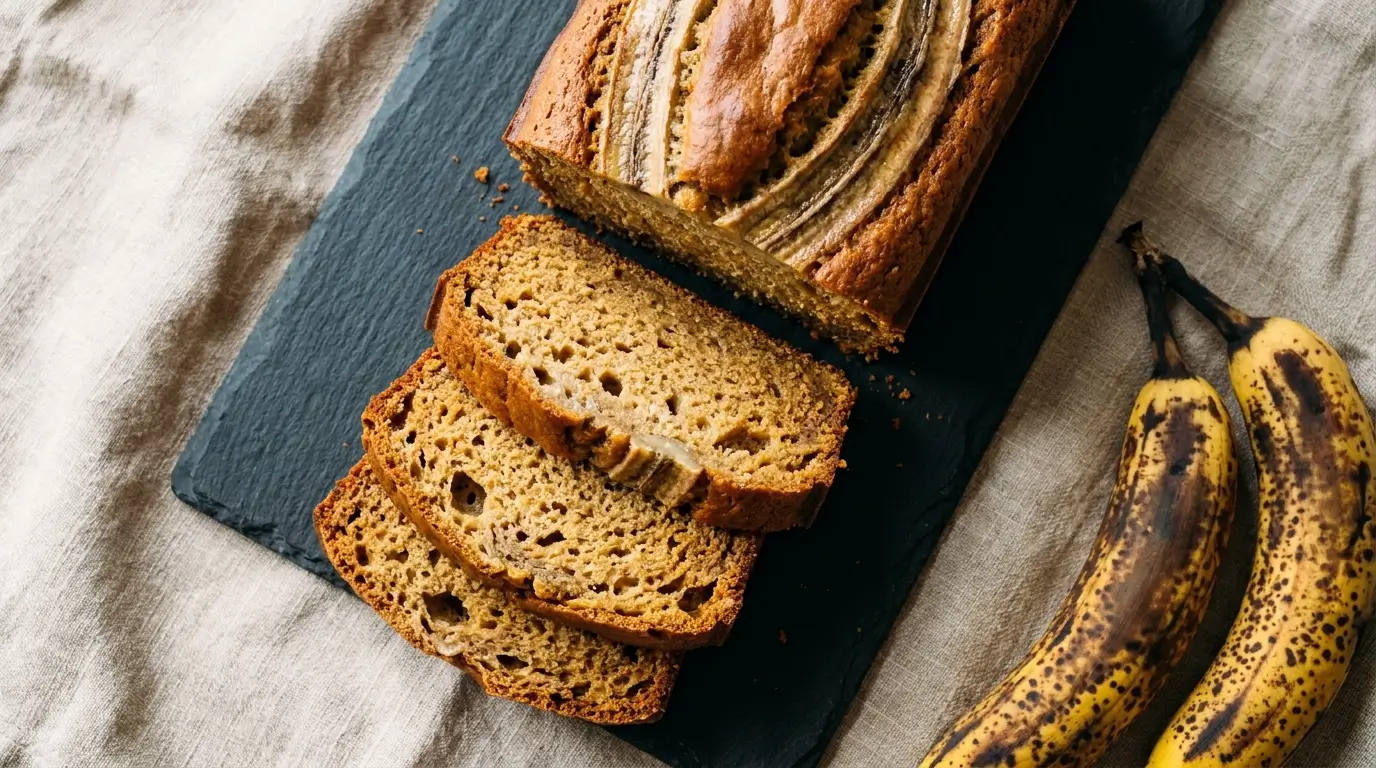
This is a banana bread recipe that works. Not the one with sour cream, cream cheese, or five different spices. The straightforward version — eight ingredients, one bowl, one loaf pan — that turns three overripe bananas into something worth making every time you forget about the fruit bowl.
What makes it reliable is understanding why it works. Banana bread is a quick bread, which means it uses chemical leavening rather than yeast. The agent is baking soda, and the acid that activates it comes from the bananas themselves. The riper the bananas, the more acid they contain, and the better the baking soda can do its job. This is not incidental to the recipe — it is the recipe. Everything else follows from it.
Table content
- 1 Why Baking Soda and Not Baking Powder
- 2 The Bananas Are the Ingredient That Actually Matters
- 3 Ingredients
- 4 Instructions
- 5 Why Your Banana Bread Might Not Be Rising Enough
- 6 Variations That Are Actually Worth Making
- 7 Storage and Freezing
- 8 Common Questions
- 9 Homemade Banana Bread With Baking Soda
- 10 Related Recipes in the Baking Cluster
Why Baking Soda and Not Baking Powder
This is the first question worth answering, because most people have both in their cupboards and have used them interchangeably without fully understanding the difference. The complete breakdown of baking powder vs. baking soda covers this in depth, but the short version for banana bread specifically is this:
Baking soda (sodium bicarbonate) is a base. It needs an acid to react and produce carbon dioxide — the gas that makes your loaf rise. Ripe bananas provide that acid. So do buttermilk, brown sugar, and eggs to a lesser degree. The reaction is immediate: CO₂ bubbles form the moment wet and dry ingredients meet, which is why you mix the batter and bake it promptly rather than letting it rest.
Baking powder, by contrast, contains its own built-in acid. It produces a milder, more neutral flavor and a slightly different crumb texture. Some banana bread recipes use both — baking soda for lift and browning, a small amount of baking powder for additional rise insurance. This recipe uses baking soda only, which gives the loaf its characteristic deep color and slightly caramelized flavor without any metallic aftertaste.
The rule: use 1 teaspoon of baking soda per standard loaf (8½ × 4½ inch / 22 × 11 cm pan). Less and the bread will be dense and under-risen. More and it will taste of soap and brown unevenly.
The Bananas Are the Ingredient That Actually Matters

Three medium bananas at peak ripeness — black-speckled skin, soft flesh, intensely sweet smell — will produce a better loaf than five slightly underripe ones. Here is what ripeness does:
Starch converts to sugar. As a banana ripens, its complex starches break down into simpler sugars. This is why overripe bananas taste sweeter and why banana bread made with them browns more deeply.
Moisture increases. Very ripe bananas are softer and release more liquid when mashed, which contributes to the moist crumb everyone wants from banana bread.
Acidity increases. The organic acids in bananas — primarily malic and citric acid — become more concentrated and accessible as the fruit ripens. These are what react with the baking soda.
If your bananas are not ripe yet, there is a useful shortcut: place unpeeled bananas on a baking sheet and roast at 300°F (150°C) for 15–20 minutes until the skins turn completely black. The heat accelerates the starch-to-sugar conversion. The result is not identical to naturally ripened bananas — some moisture is lost — but the sweetness and acidity are dramatically improved over a firm yellow banana.
Ingredients
Yield: 1 loaf (10 slices) | Prep Time: 15 minutes | Bake Time: 60 minutes | Total Time: 75 minutes
| Ingredient | US Measurement | Metric |
|---|---|---|
| Very ripe bananas, mashed | 3 medium (about 1¼ cups mashed) | ~300 g peeled |
| All-purpose flour | 1½ cups | 190 g |
| Baking soda | 1 tsp | 5 g |
| Fine sea salt | ½ tsp | 3 g |
| Unsalted butter, melted and cooled | ⅓ cup | 75 g |
| Granulated sugar | ¾ cup | 150 g |
| Large egg, beaten | 1 | 1 |
| Pure vanilla extract | 1 tsp | 5 ml |
Optional add-ins (fold in at the end of step 4):
- ½ cup (85 g) semi-sweet chocolate chips
- ½ cup (55 g) chopped walnuts or pecans
- ½ tsp cinnamon + ¼ tsp nutmeg
- ¼ cup (60 g) sour cream or plain yogurt for extra moisture
Instructions
Step 1 — Prep the oven and pan
Preheat your oven to 350°F (175°C). Grease a 9 × 5 inch (23 × 13 cm) or 8½ × 4½ inch (22 × 11 cm) loaf pan with butter or non-stick spray, then line the long sides with a strip of parchment paper, leaving an overhang on each side. This “sling” makes lifting the finished loaf out effortless.
The smaller 8½ × 4½ inch pan produces a taller, more domed loaf. The larger 9 × 5 inch pan produces a flatter, wider one that slices more evenly. Both work; the bake time is the same.
Step 2 — Mash the bananas
Peel the bananas into a large bowl. Mash thoroughly with a fork until almost smooth — a few small lumps are fine and add texture. You want about 1¼ cups (300 g) of mashed banana. Measure it; too much makes the center gummy, too little makes the loaf dry.
Step 3 — Mix the wet ingredients

Add the melted butter to the mashed banana and stir to combine. Add the sugar, beaten egg, and vanilla extract. Mix until uniform. The butter should be cooled to room temperature before adding — hot butter can partially cook the egg and affect the final texture.
Step 4 — Add the dry ingredients
Sprinkle the flour, baking soda, and salt over the wet mixture. Using a spatula or wooden spoon, fold gently until just combined — no dry streaks, but do not overmix. Overmixing develops gluten, which makes the crumb tight and rubbery rather than tender and open.
The batter will be thick. That is correct.
Step 5 — Bake

Pour the batter into the prepared pan and smooth the top. If you want a bakery-style split down the center of the loaf, run a butter knife lengthwise through the middle of the batter before baking. The split will open as the loaf rises.
Bake for 55–65 minutes, until a toothpick or skewer inserted into the center comes out clean or with a few moist crumbs (not wet batter). The top should be deep golden brown. If the top is browning too quickly before the center is set, tent loosely with foil after 45 minutes.
Internal temperature: 200–205°F (93–96°C) at the center means it is fully baked.
Step 6 — Cool in the pan, then on a rack
Let the loaf cool in the pan for 15 minutes, then use the parchment sling to lift it out onto a wire rack. Cool for at least 30 minutes before slicing. The crumb continues to set as it cools; cutting into a hot loaf releases steam and makes the interior look underdone even when it is not.
Why Your Banana Bread Might Not Be Rising Enough
If your loaves consistently come out flat or dense, there are three likely culprits:
Old baking soda. Baking soda loses its potency over time, especially if it has been sitting open in a humid kitchen. To test yours: drop ½ teaspoon into a cup of hot water with a splash of white vinegar. If it bubbles vigorously immediately, it is active. If it fizzes weakly or not at all, replace it. For everything you need to know about baking soda’s shelf life and storage, the guide to what baking soda is and how it works is worth reading before your next bake.
Bananas that were not ripe enough. Underripe bananas contain less acid, which means the baking soda has less to react with. The result is a denser loaf with a slightly bitter aftertaste from unreacted sodium bicarbonate. Use the oven-ripening method above if you need to speed the process.
Overmixed batter. Once the flour goes in, every additional stir tightens the gluten network. Ten folds is usually enough. When in doubt, stop early.
Variations That Are Actually Worth Making
Brown butter banana bread
Instead of simply melting the butter, continue cooking it in a light-colored saucepan over medium heat, swirling occasionally, until the milk solids turn golden and it smells nutty — about 5 minutes. Cool completely before adding. The result is a significantly more complex flavor: toasty, almost caramel-like, with the banana playing a supporting role rather than leading.
Whole wheat banana bread
Replace up to half the all-purpose flour with whole wheat flour (swap 1:1 by weight). The loaf will be slightly denser and more filling, with a mild nuttiness that pairs well with walnuts. Add 1 tablespoon of honey to compensate for the reduced sweetness.
Chocolate marble banana bread
Make the base recipe. In a separate small bowl, mix 3 tablespoons of cocoa powder with 2 tablespoons of melted butter and 1 tablespoon of sugar. Spoon two-thirds of the banana batter into the pan, dollop the cocoa mixture over it, then add the remaining batter. Swirl once with a knife. Do not over-swirl — you want distinct streaks, not a uniform brown batter.
Mini loaves
Divide the batter between two 5¾ × 3 inch (14.5 × 7.5 cm) mini loaf pans. Bake at the same temperature for 35–45 minutes. Mini loaves cool faster and are easier to wrap and freeze individually.
Storage and Freezing

Room temperature: Wrap the cooled loaf tightly in plastic wrap or beeswax wrap. Keeps well for 3–4 days. Do not refrigerate — cold temperatures accelerate staling and make the crumb gummy.
Sliced vs. whole: A whole unsliced loaf stays moist longer than a pre-sliced one. If you plan to eat it over several days, slice as needed rather than all at once.
Freezer: Banana bread freezes exceptionally well. Wrap the cooled loaf (or individual slices) tightly in plastic wrap, then in foil, and freeze for up to 3 months. Thaw whole at room temperature for 2–3 hours, or toast individual slices directly from frozen.
Common Questions
Can I use frozen bananas?
Yes — and frozen-then-thawed bananas are often better than fresh overripe ones for this purpose. Freezing ruptures the cell walls, which speeds the release of sugars and liquid when thawed. Thaw completely, drain any excess liquid, then mash as usual. The resulting banana purée is intensely sweet and flavorful.
Can I make this without eggs?
The egg acts as a binder and contributes to structure. Without it, the loaf will be denser and more fragile. A workable substitute: 1 flax egg (1 tablespoon ground flaxseed + 3 tablespoons water, rested for 5 minutes) or 3 tablespoons of unsweetened applesauce. Expect a slightly different texture but acceptable results.
Can I reduce the sugar?
You can reduce to ½ cup (100 g) without significantly affecting texture, especially if your bananas are very ripe. Going lower than that affects not just sweetness but browning and moisture retention — the Maillard reaction requires sugar.
Why is my banana bread gummy in the middle?
Either underbaked or cut too soon. Check with a thermometer (200°F / 93°C at center), tent with foil if the top is browning too fast, and always rest the loaf for at least 30 minutes before slicing.
What is the difference between banana bread and banana cake?
Structure and fat content, primarily. Cake uses more fat (butter or oil), more sugar, and often cake flour or a higher ratio of eggs for a lighter, finer crumb. Banana bread uses less fat, less sugar, all-purpose flour, and produces a denser, sturdier loaf. Both are chemically leavened. The line is blurry — banana bread with cream cheese frosting is simply a banana cake that has retained its loaf shape.
Homemade Banana Bread With Baking Soda
A reliable, straightforward banana bread made with ripe bananas and baking soda for a moist crumb and deep caramelized flavor.
- Prep Time: 15 minutes
- Cook Time: 60 minutes
- Total Time: 75 minutes
- Yield: 1 loaf (10 slices) 1x
- Category: Dessert
- Method: Baking
- Cuisine: American
- Diet: Vegetarian
Ingredients
- 3 medium very ripe bananas (about 1¼ cups mashed / 300 g)
- 1½ cups all-purpose flour (190 g)
- 1 tsp baking soda (5 g)
- ½ tsp fine sea salt (3 g)
- ⅓ cup unsalted butter, melted and cooled (75 g)
- ¾ cup granulated sugar (150 g)
- 1 large egg, beaten
- 1 tsp pure vanilla extract (5 ml)
Instructions
- Preheat oven to 350°F (175°C) and grease a loaf pan. Line with parchment paper.
- Mash bananas in a large bowl until mostly smooth.
- Add melted butter and mix. Stir in sugar, beaten egg, and vanilla.
- Add flour, baking soda, and salt. Fold gently until just combined.
- Pour batter into prepared pan and smooth the top.
- Bake for 55–65 minutes until a toothpick comes out clean or with moist crumbs.
- Cool in pan for 15 minutes, then transfer to a rack to cool before slicing.
Notes
Use very ripe bananas for best flavor and proper rise. Do not overmix the batter. Check doneness with a toothpick or internal temperature of 200–205°F (93–96°C).
Nutrition
- Serving Size: 1 slice
- Calories: 210
- Sugar: 18g
- Sodium: 180mg
- Fat: 8g
- Saturated Fat: 4g
- Unsaturated Fat: 3g
- Trans Fat: 0g
- Carbohydrates: 32g
- Fiber: 1g
- Protein: 3g
- Cholesterol: 30mg
Keywords: banana bread, baking soda, easy banana bread, homemade loaf, quick bread
Related Recipes in the Baking Cluster

If you bake banana bread regularly, the logic of quick-bread chemistry becomes very transferable. Irish soda bread uses the same baking soda + acid principle but strips it down to four ingredients — it is the purest illustration of how the reaction works. Buttermilk biscuits apply the same concept with cold fat and a much shorter bake time. All three are part of the baking cluster here, where every recipe explains not just what to do but why it works.