Most Easter egg dyeing guides tell you to add vinegar to your dye bath. Baking soda does something different — and in some cases, something more interesting. Because it’s alkaline rather than acidic, it shifts the chemistry of natural dyes in ways that vinegar can’t, unlocking entirely different color ranges from the same kitchen ingredients. It also creates a fizzing reaction with vinegar-based dye baths that kids find genuinely exciting and that produces a natural mottled, speckled texture on the shell.
This guide covers three distinct methods for dyeing Easter eggs with baking soda — the natural dye pH shift, the fizz-texture technique, and a simple all-baking-soda natural dye bath — with clear instructions, the science behind why each works, and practical notes on which method suits which age group.
Table content
- 1 Why baking soda changes egg dye colors: the short science
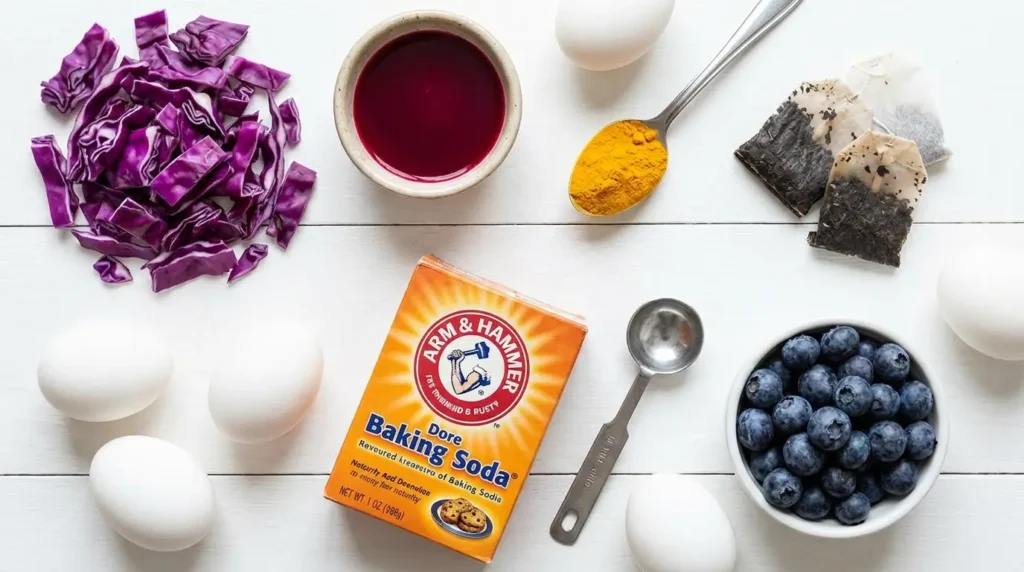
- 2 What you need (for all methods)
- 3 Natural dye color guide
- 4 Method 1: The natural dye alkaline bath
- 5 Method 2: The fizz-texture technique
- 6 Method 3: Simple baking soda and food coloring bath
- 7 Age-appropriate guidance
- 8 Tips for better results
- 9 Common questions
Why baking soda changes egg dye colors: the short science
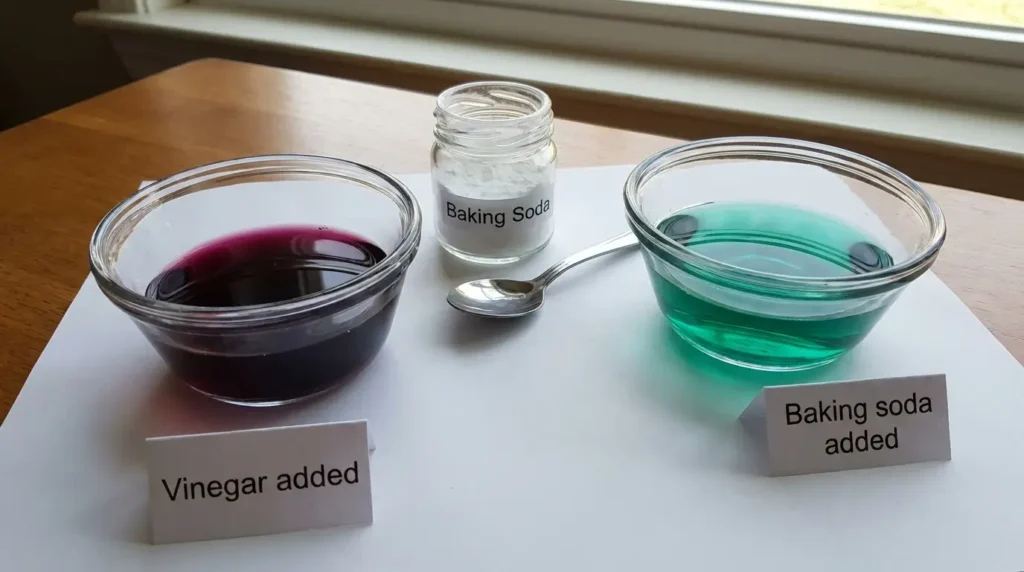
The colors produced by natural dyes — red cabbage, beet juice, turmeric, onion skins, black tea — are pH-sensitive. The same pigment produces dramatically different colors depending on whether it’s in an acidic or alkaline environment. This is the same principle behind litmus paper: the pigment molecule changes shape at different pH levels, and that shape change determines which wavelengths of light it absorbs, which determines the color you see.
Red cabbage is the most dramatic example. Its pigment, an anthocyanin, is deep purple-red in an acid environment (like a vinegar dye bath) and shifts toward blue, then green, and finally yellow-green as the environment becomes more alkaline. Add baking soda to a red cabbage dye bath and you move the needle from purple toward teal or green — a color that’s essentially impossible to achieve from red cabbage with a vinegar method.
Baking soda is sodium bicarbonate — a mild base (pH around 8.3 in water). For a deeper look at the chemistry, the complete guide to what baking soda is covers the acid-base reactions in plain English. For egg dyeing, what matters is that adding baking soda to a natural dye bath shifts the pH upward and shifts the color with it.
Synthetic food coloring dyes are less pH-sensitive than natural dyes — the color shift is subtler or absent, depending on the specific dye. For the most visually dramatic effects, natural dyes are the right choice when baking soda is involved.
What you need (for all methods)
- Hard-boiled eggs, cooled to room temperature
- Baking soda
- White vinegar (for the fizz method)
- Natural dye ingredients (see below) or food coloring
- Small bowls, mugs, or cups — one per color
- A spoon or tongs for dipping
- Paper towels
- Optional: rubber gloves (natural dyes stain fingers)
Hard-boiling tip: For eggs that won’t crack during dyeing, let them come to room temperature before dipping. Cold eggs in a warm dye bath can develop micro-cracks. Allow at least 30 minutes out of the refrigerator before you start.
Natural dye color guide
These are the most reliable natural dye sources and what they produce in acidic (vinegar) vs. alkaline (baking soda) environments:
| Natural dye source | Color with vinegar (acid) | Color with baking soda (alkaline) |
|---|---|---|
| Red cabbage | Purple / blue-purple | Teal / blue-green / soft green |
| Beet juice | Deep pink / magenta | Pale pink / muted rose |
| Turmeric | Bright yellow | Deeper gold / orange-yellow |
| Black tea | Warm tan / brown | Similar tan (less shift) |
| Red onion skins | Reddish brown | More muted brown |
| Blueberries | Blue-purple | Softer, greyer blue |
| Spinach | Pale green | Similar / slightly yellower |
Red cabbage produces the most dramatic shift and is the best choice for a science-focused activity with kids. Beet juice and turmeric both work well and are easy to source. Onion skin and black tea produce less dramatic color differences between the two methods but are good for earthy tones.
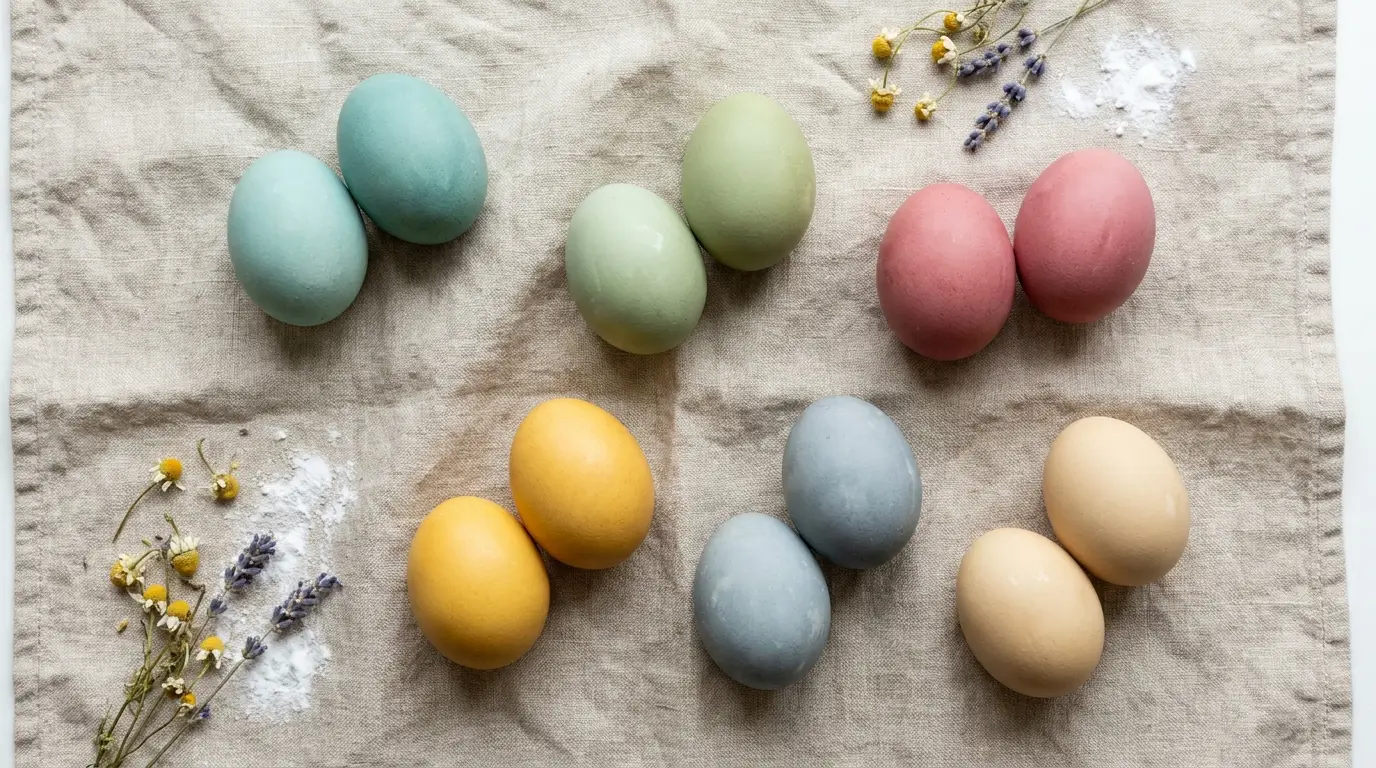
Method 1: The natural dye alkaline bath
This method produces the color-shifted results in the table above. It’s straightforward, produces consistent results, and is the best choice when you want a specific color (particularly any teal or green from red cabbage).
Make the dye concentrate: Simmer your chosen natural ingredient in water for 20–30 minutes. General ratios: 2 cups chopped red cabbage per 2 cups water; 1 cup beet juice per 1 cup water; 2 tablespoons turmeric powder per 2 cups water (strain before using). Let the liquid cool to room temperature before dyeing.
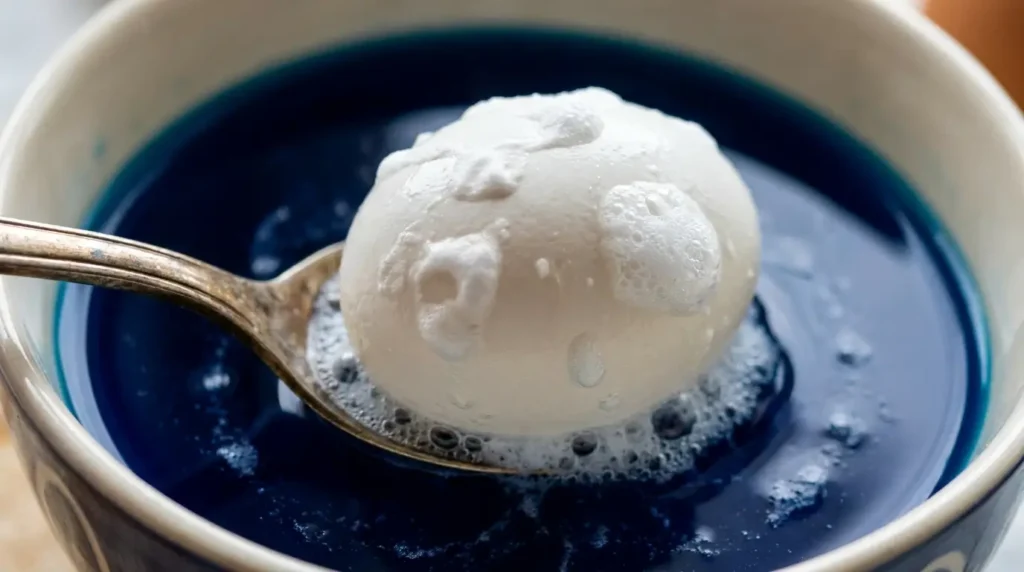
Make the alkaline dye bath: Combine 1 cup of your cooled dye concentrate with 1 teaspoon of baking soda and 1 teaspoon of salt in a bowl or mug deep enough to submerge an egg. Stir until the baking soda dissolves. If you’re using red cabbage dye, watch the color shift happen as you stir in the baking soda — it changes from purple to blue-green in seconds, which is a great demonstration for curious kids.
Dye the eggs: Lower eggs gently into the dye bath using a spoon. Soak for 10–30 minutes depending on the depth of color you want. Check every few minutes — natural dyes build gradually and the final color lightens slightly as the egg dries, so aim a shade or two darker than your target.
Remove, dry on paper towels, and allow to air-dry fully before handling. Colors will be softer and more muted than synthetic food coloring — that’s characteristic of natural dyeing and part of the appeal.
Method 2: The fizz-texture technique
This is the most kid-engaging method because the chemistry is visible and audible. It combines the traditional vinegar dye bath with baking soda applied directly to the egg, creating a fizzing reaction on the shell that leaves a natural mottled, speckled, or marbled surface texture.
Make the vinegar dye bath: Mix 1 cup water, 1 tablespoon white vinegar, and 10–15 drops of food coloring (or ½ cup natural dye concentrate) in a bowl. This is a standard vinegar egg dye bath.
Apply baking soda to the egg: Mix 1 tablespoon of baking soda with just enough water to form a loose paste — roughly 1 teaspoon of water. Using a small paintbrush, a fingertip, or a cotton swab, apply the paste to a hard-boiled egg in any pattern you like: random splotches for a speckled effect, stripes, dots, or full coverage for an all-over texture.
Dip in the dye bath immediately: While the paste is still wet, lower the egg into the dye bath. The baking soda and vinegar react on contact — CO₂ bubbles form at every point where the paste meets the acid bath. Those bubbles resist the dye while they’re present, creating lighter spots, rings, and texture patterns around each bubble site. The egg will fizz for 30–60 seconds.
Leave the egg in the dye bath for 3–5 minutes after the fizzing stops, then remove and dry.
What affects the result: The thickness of the paste application controls the intensity of the texture effect. More paste = more bubbling = more pronounced light patches. Thin, scattered dots give a speckled look; heavy coverage gives a dramatic marbled pattern. Let kids experiment — the variation is part of the process.
Method 3: Simple baking soda and food coloring bath
This is the most straightforward method: replace vinegar with baking soda entirely as the bath additive, using standard food coloring.
Mix 1 cup water, 1 teaspoon baking soda, and 10–15 drops of food coloring. Soak eggs for 5–15 minutes.
The results are noticeably different from a vinegar bath: the alkaline environment affects how some food-coloring dyes bond to the eggshell, generally producing softer, slightly pastel-shifted tones compared to the same colors in a vinegar bath. Blue and purple dyes tend to shift greener; red dyes tend to go slightly more orange. Green and yellow are relatively stable.
This method works well for younger children because it produces no vinegar smell and the chemistry is gentler. The color uptake is slightly less intense than a vinegar bath for most synthetic dyes, but for pastel Easter colors — which tend to be the goal — this is actually desirable.
Age-appropriate guidance

Ages 3–5: Method 3 (baking soda and food coloring bath) is the right fit. Simple, no strong smells, safe if handled, and the colors are cheerful. Focus on the dipping and waiting, not the chemistry. Pre-mix the dye baths before the activity starts.
Ages 6–9: Method 1 with red cabbage is excellent — old enough to understand the color-change demonstration, young enough to be genuinely amazed by it. The fizz method (Method 2) also works well at this age with adult supervision for the vinegar dye bath.
Ages 10 and up: All three methods, with the chemistry explanation made explicit. This is a real and interesting chemistry demonstration — pH-sensitive dyes and acid-base reactions are concepts that appear in school science from around year 5 or 6 onward. Encouraging kids to test the same dye with both vinegar and baking soda side-by-side turns it into a proper experiment.
Tips for better results

Use white eggs, not brown. The dye color shows clearly on a white shell; on brown eggs, every color is muddied by the underlying shell pigment. White eggs are the standard for any egg-dyeing project.
Dry completely before displaying or handling. Natural dye in particular transfers easily from a damp shell. Allow 15–20 minutes of air-drying after removing from the bath, ideally on a wire rack rather than paper towels (which can stick to a wet shell).
Layer colors for depth. Dye an egg in a light color first, let it dry fully, then dip briefly in a second color. The base layer shows through where the second color hasn’t fully covered. Natural dyes layer particularly beautifully.
Add a shine with a little oil. A drop of vegetable oil rubbed gently over a fully dry natural-dyed egg gives the colors a richer, deeper appearance. Synthetic food coloring doesn’t benefit as noticeably, but it doesn’t hurt either.
Cold eggs crack less in the dye bath. If your egg develops a hairline crack from temperature shock, the dye will bleed into it, creating an interesting vein pattern — or a mess, depending on your perspective. Letting eggs fully reach room temperature before dyeing is the prevention.
Common questions
Can I eat the eggs afterward?
Eggs dyed with food coloring and baking soda are safe to eat if the shell was uncracked throughout the process and the eggs were handled hygienically. Natural dyes (from food ingredients) are also food-safe. Discard any egg with a visible crack after dyeing.
Do I need to boil the eggs before dyeing?
Hard-boiled eggs are standard for Easter egg dyeing that involves handling, display, and egg hunts. If you’re dyeing purely for decoration and won’t eat or handle the eggs repeatedly, you can blow out raw eggs (pierce each end and blow out the contents), though this is more fragile to work with.
How long do the colors last on the shell?
Natural dye colors fade faster than synthetic ones — within a few weeks with light exposure. Keep naturally dyed eggs out of direct sunlight if you’re displaying them. Synthetic food coloring holds color for months in normal indoor conditions.
Can I mix baking soda and vinegar dye baths together in the bowl?
Not if you want a functional dye bath — they react immediately and neutralize each other, leaving essentially just water and dissolved sodium acetate. Use them separately: baking soda for the alkaline bath (Method 1 and 3), vinegar for the conventional bath that you then apply baking soda paste onto (Method 2).
This is one of the most genuinely science-rich activities in the kids’ crafts category — the color-shift demonstration with red cabbage dye is a real chemistry lesson, not just a craft. For more baking soda projects that double as science demonstrations, the kids and crafts hub has the full collection, including the classic baking soda volcano experiment and no-borax baking soda slime.